
Turning My ESP32 into a DNS Sinkhole
Smartphones are great, but lately, it feels like my iPhone has been a net negative in my life.
Of course, my phone itself is fine: it's a marvelous piece of engineering that's kept up with me for years now. The problem has more to do with me and my sometimes embarrassingly low resistance to doomscrolling.
For the uninitiated, doomscrolling is essentially when one passively scrolls through endless feeds of content on social media until eventually stopping to realize that they've wasted the last five minutes of their life doing something entirely unproductive. Scrolling of this kind sucks because it literally takes away time one could've spent socializing, exercising, or learning new concepts and skills.
Earlier this week, one particular social media doomscroll bothered me enough, to the point where I decided that things had to change! I wanted to create a fix for this problem.
So, for the past few days, I've been working on turning my ESP32 (a low-power, $8 microcontroller) into a DNS server that routes social media-related web traffic from my iPhone to a non-routable IP (0.0.0.0).
I wrote the following article to document my experience building this nifty "DNS sinkhole," and to share what I've learned about DNS, networking, and low-level programming in the process.
What's DNS?
The Domain Name System (DNS) is a protocol that allows humans to more effectively navigate the internet. It's the piece of networking glue that's responsible for DNS resolution (i.e., translating domain names into their corresponding IP addresses):
google.com ➡️ 64.233.185.101Oftentimes, this domain "lookup" is not something that most users of the internet concern themselves with. That's because DNS resolution—on your phone, computer, or any other device—is typically handled automatically, by way of your ISP's DNS server.
Fortunately, though, you can change your DNS server, and in fact, companies like Google and Cloudflare operate their own public DNS servers that you can configure your device to use. Cloudflare touts that its offering (1.1.1.1) is the "fastest DNS resolver available," so that's what I'll be using as an example throughout this article.
But, what's a sinkhole?
A DNS sinkhole is a special type of DNS server.
Although it, like any other DNS server, returns an IP address when asked about a particular domain name, it actually doesn't lookup the real address for certain domains.
Instead, it deliberately responds with an "invalid", non-routable (otherwise known as "private") IP address (typically 0.0.0.0) for specific domains—domains that we don't want to properly resolve for whatever reason. This is how devices like the Pi-hole are able to block ads on all of the devices connected to a particular network.
For our use-case, we'll be resolving a set of domains used by social media websites to 0.0.0.0 instead of their actual IP addresses.
That should be all the background information you need for now; let's dive into the code!
Connecting to the Internet
The first step is getting our ESP32 connected to the internet, and thankfully, the ESP32 comes with built-in Wi-Fi support.
For simplicity's sake, I'm going to be using the Arduino IDE to program our microcontroller, but of course, you should probably use something more extensive for more complex projects.
Here's how we can establish a Wi-Fi connection:
1 | |
2 | |
3 | |
4 | |
5 | |
6 | |
7 | |
8 | |
9 | |
10 | |
11 | |
12 | |
13 | |
14 | |
15 | |
16 | |
17 | |
18 | |
19 | |
20 | |
21 | |
22 | |
23 | |
Pretty simple stuff, right? The setup() method runs once when the program starts, and it's where we attempt to connect to our desired Wi-Fi network.
I've just put some code in the loop(), which repeatedly runs right after the setup method, and it prints out the ESP32's local IP every 10 seconds (take note of this IP - we'll be using it later).
Setting up a simple DNS server
It's time to start working on the core functionality of our sinkhole.
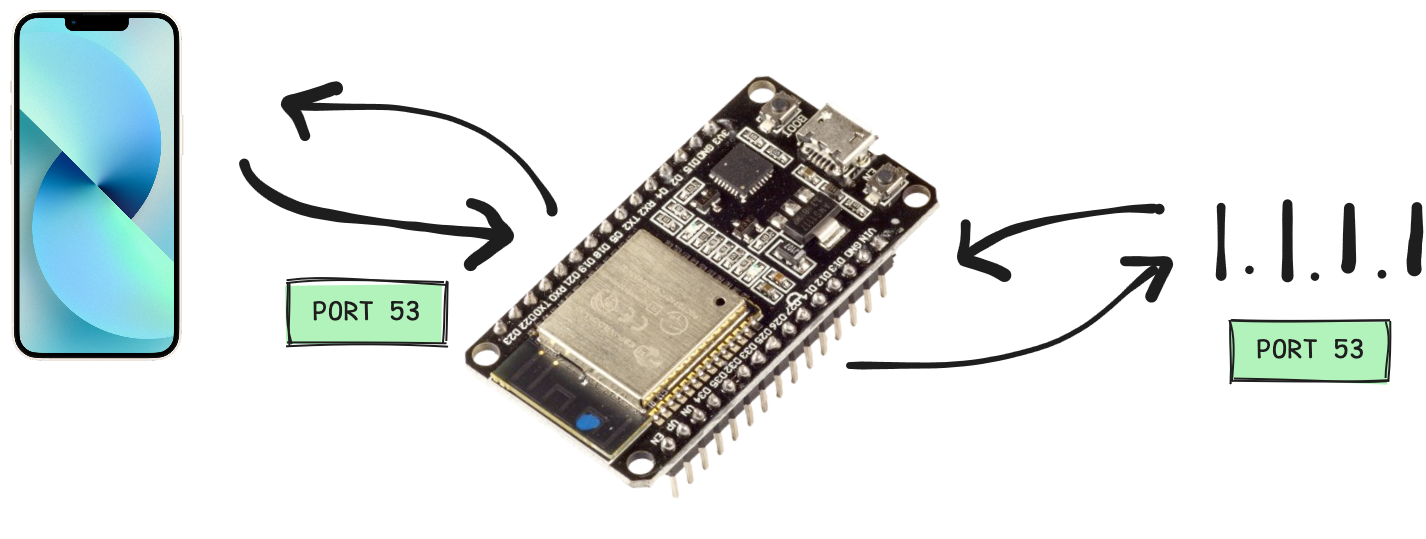
As you can see in the diagram above, we want our ESP32 to sit between an "actual" DNS server (Cloudflare's 1.1.1.1) and the client (the iPhone), so that it can make DNS lookups when it sees a valid domain that it shouldn't block. So, we'll need to receive requests on the standard DNS port (port 53) on the ESP32, and send requests to 1.1.1.1:53.
Coding this up is fairly straightforward:
1 | |
2 | |
3 | |
4 | |
5 | |
6 | |
7 | |
8 | |
9 | |
10 | |
11 | |
12 | |
13 | |
14 | |
15 | |
16 | |
17 | |
18 | |
19 | |
20 | |
21 | |
22 | |
23 | |
24 | |
25 | |
26 | |
27 | |
28 | |
29 | |
30 | |
31 | |
32 | |
33 | |
34 | |
35 | |
36 | |
37 | |
38 | |
39 | |
40 | |
41 | |
42 | |
43 | |
44 | |
45 | |
46 | |
47 | |
48 | |
49 | |
50 | |
51 | |
52 | |
Now, when we get a DNS query on port 53, the handleIncomingDnsQuery() method is called, and when we get a response from Cloudflare's DNS, handleCloudflareResponse() is called. As it stands, we don't actually do anything in the bodies of either of these methods, but that'll change soon.
For now, take note of the fact that we're using UDP for speed and performance reasons (although TCP would work just fine, as well).
Understanding DNS packets
Take a look at the handleIncomingDnsQuery() method.
You'll see that it takes in one parameter: AsyncUDPPacket packet. We'll be responsible for mutating this packet and returning the modified version.
To help explain the structure of this DNS packet, I'll be using ASCII diagrams sourced from Prof. Alan Mislove's (Northeastern University) incredible PDF covering the DNS protocol (please check out this amazing resource here).
DNS packets start off with a header:
  0  1  2  3  4  5  6  7  8  9 10 11 12 13 14 15
+--+--+--+--+--+--+--+--+--+--+--+--+--+--+--+--+
|                      ID                       |
+--+--+--+--+--+--+--+--+--+--+--+--+--+--+--+--+
|QR|   Opcode  |AA|TC|RD|RA|   Z    |   RCODE   |
+--+--+--+--+--+--+--+--+--+--+--+--+--+--+--+--+
|                    QDCOUNT                    |
+--+--+--+--+--+--+--+--+--+--+--+--+--+--+--+--+
|                    ANCOUNT                    |
+--+--+--+--+--+--+--+--+--+--+--+--+--+--+--+--+
|                    NSCOUNT                    |
+--+--+--+--+--+--+--+--+--+--+--+--+--+--+--+--+
|                    ARCOUNT                    |
+--+--+--+--+--+--+--+--+--+--+--+--+--+--+--+--+
As you can see, there are a lot of fields, each serving a different purpose, but we'll primarily be interested in the...
- ID: a unique identifier that makes up the first set of 16 bits; used to match received responses with queries.
- Flags: the entire second set of 16 bits, but we're particularly interested in QR (set to 0 if the message is a query, 1 if it's a response) and RCODE (set to 0000 if there was no error in returning a response, 0010 for server failure).
- ANCOUNT: number of records in the answer section; for all practical purposes, will be set to 1 in our response (while it's possible to fit multiple IPs within a single DNS query—and therefore have multiple records within a response—it's pretty much never done).
In our code, we can represent each of the fields in the DNS header using a struct:
1 | |
2 | |
3 | |
4 | |
5 | |
6 | |
7 | |
8 | |
After the header comes the DNS question:
  0  1  2  3  4  5  6  7  8  9 10 11 12 13 14 15
+--+--+--+--+--+--+--+--+--+--+--+--+--+--+--+--+
|                                               |
/                     QNAME                     /
/                                               /
+--+--+--+--+--+--+--+--+--+--+--+--+--+--+--+--+
|                     QTYPE                     |
+--+--+--+--+--+--+--+--+--+--+--+--+--+--+--+--+
|                     QCLASS                    |
+--+--+--+--+--+--+--+--+--+--+--+--+--+--+--+--+
We'll just be focusing on QNAME, which starts off with a length octet (sequence of 8 bits) describing how many subsequent octets—each containing an ASCII character—must be read to form the first label. There may be several of these bit sequences (length octets followed by a series of ASCII octets) up until a null octet appears (00000000), marking the end of the QNAME section.
Following the DNS question comes the final section we're interested in: the DNS answer. Here's what that looks like:
  0  1  2  3  4  5  6  7  8  9 10 11 12 13 14 15
+--+--+--+--+--+--+--+--+--+--+--+--+--+--+--+--+
|                                               |
/                      NAME                     /
/                                               /
+--+--+--+--+--+--+--+--+--+--+--+--+--+--+--+--+
|                      TYPE                     |
+--+--+--+--+--+--+--+--+--+--+--+--+--+--+--+--+
|                     CLASS                     |
+--+--+--+--+--+--+--+--+--+--+--+--+--+--+--+--+
|                      TTL                      |
|                                               |
+--+--+--+--+--+--+--+--+--+--+--+--+--+--+--+--+
|                    RDLENGTH                   |
+--+--+--+--+--+--+--+--+--+--+--+--+--+--+--+--|
/                     RDATA                     /
/                                               /
+--+--+--+--+--+--+--+--+--+--+--+--+--+--+--+--+
We're interested in every field in the answer section, since we're building a DNS server that should respond with a complete DNS answer.
Most of these fields aren't that hard to grasp, though, so let's specifically focus on the NAME: the same domain name found in QNAME. You might think that including the full domain name a second time is repetitive and wastes precious bits, and you'd be right! This is why DNS compression is used: essentially, we can place a pointer in this field to QNAME in the question section instead of repeating the domain name, thereby saving space.
And, that's it - those are the DNS sections we'll be reading and mutating! Although there are other sections that can be included in a DNS packet, we won't concern ourselves with them for this project.
Handling incoming DNS queries
Now that we have a good understanding of the structure of DNS packets, it's time to start actually implementing the handleIncomingDnsQuery() method. Remember, this method takes in a DNS packet, and either:
- Returns 0.0.0.0 if the query is for a domain corresponding to a social media site.
- Returns the actual IP address for the domain per usual (accomplished by forwarding the request to 1.1.1.1).
Let's handle #1 (the domain blocking) first.
To begin, we'll need a list of domains that correspond to each of the social media websites we're trying to block.
Fortunately, there's a really nice GitHub repository that compiles lists of such domains for popular online services. For instance, here's the list of primary domains for Reddit:
redd.it
reddit.com
redditblog.com
reddithelp.com
redditinc.com
redditmail.com
redditmedia.com
redditspace.com
redditstatic.com
redditstatus.com
We take such domains for sites like Facebook, Instagram, Reddit, TikTok, X/Twitter, and YouTube, and put them in a file separate from our Arduino code:
1 | |
2 | |
3 | |
4 | |
5 | |
6 | |
7 | |
8 | |
9 | |
10 | |
11 | |
...and turn it into a set so that we can perform constant-time lookup in our program:
1 | |
2 | |
3 | |
4 | |
5 | |
6 | |
7 | |
8 | |
9 | |
10 | |
11 | |
12 | |
13 | |
14 | |
15 | |
16 | |
17 | |
In order to perform a lookup in this set, we now need to extract the primary domain from the question in the DNS packet. Let's use what we've learned about DNS packet structure to help us do this!
We can start by casting the AsyncUDPPacket packet to a DNSHeader pointer, and we can get ready to read the full domain into a char array with length 253 (this buffer is big enough to fit the largest possible domain name):
1 | |
2 | |
3 | |
4 | |
5 | |
Time to read the domain name into the buffer! This is accomplished by reading a value (k) out of a length octet for a label, consuming k-many character octets and populating the fullDomainName array with them, and placing a dot ('.') to separate the current label from the next:
1 | |
2 | |
3 | |
4 | |
5 | |
6 | |
7 | |
8 | |
9 | |
10 | |
11 | |
12 | |
13 | |
14 | |
15 | |
16 | |
17 | |
18 | |
19 | |
20 | |
21 | |
22 | |
23 | |
24 | |
25 | |
26 | |
27 | |
28 | |
Yay! We've successfully read the entire domain into our buffer, but we now have to extract the primary domain from this C-string, so that we can perform a lookup in our set:
<second_level_domain>.<TLD>This isn't too hard to do: we can just traverse fullDomainName backwards until...
- We see a second dot ('.').
- We're at the beginning of fullDomainName (i.e., fullDomainName is a primary domain).
Here's what that'd look like as code:
1 | |
2 | |
3 | |
4 | |
5 | |
6 | |
7 | |
8 | |
9 | |
10 | |
11 | |
12 | |
13 | |
14 | |
15 | |
Easy peasy! We're almost ready to perform a set lookup and respond with a non-routable IP address if the domain exists in the set. Before we do that, though, we need a bigger buffer for our packet—a buffer that'll be big enough to fit our existing DNS header and question, as well as the answer section we're about to add.
We know the answer section is going to take up 16 bytes, so we just have to create a new buffer that's 16 bytes bigger than our packet:
1 | |
2 | |
3 | |
4 | |
5 | |
Okay, now we're ready to perform the lookup, and modify the response if the domain is in the BLOCKLIST!
1 | |
2 | |
3 | |
4 | |
5 | |
6 | |
7 | |
8 | |
9 | |
10 | |
11 | |
12 | |
13 | |
14 | |
15 | |
16 | |
17 | |
18 | |
19 | |
20 | |
21 | |
22 | |
23 | |
24 | |
25 | |
26 | |
27 | |
28 | |
29 | |
30 | |
31 | |
32 | |
33 | |
34 | |
35 | |
36 | |
37 | |
38 | |
39 | |
Woah... a lot is happening in the code block above, so let's go over the most crucial parts in detail:
- Line 2 seems a bit crazy, but all we're doing is performing a bitwise OR on the DNS header flags we already had. You'll notice that we're just setting the QR bit (the most significant bit) to 1, explicitly indicating that the packet we're about to send is a response and not a query. If the ntohs / htons methods seem unfamiliar to you, just know that they're used to flip the byte orderings from network byte order (big-endian) to host byte order (little-endian), and vice-versa.
- In line 3, ancount is set to one, since we're sending one IP address.
- Lines 8-9 are where we make use of DNS compression, the concept we touched upon earlier. The answer section simply has a pointer to the domain name in the question section.
- We set the IP address to 0.0.0.0 in lines 30-33, and we send off this response on line 36!
- Finally, we use the "return early" pattern on line 38, so any code we write after this conditional won't be executed.
That last part is important, because it allows us to handle domains that aren't in the BLOCKLIST by including the following code directly after the if statement:
1 | |
2 | |
3 | |
4 | |
5 | |
6 | |
On line 6, we make a request to 1.1.1.1 in order to get the actual IP address for the domain, but before that, we make use of a map called dnsRequests. We can define this map as a global variable...
1 | |
2 | |
3 | |
4 | |
5 | |
6 | |
7 | |
8 | |
...that keeps track of pending DNS requests made by the client to the ESP32, so that responses to queries made by the ESP32 to Cloudflare DNS may be correctly matched and forwarded.
That's all for the handleIncomingDnsQuery() method; we're good to move on to the final step of our project.
Dealing with responses from 1.1.1.1
When Cloudflare DNS comes back with a response, we've got to handle it! After all, our request from the ESP32 to 1.1.1.1 won't magically relay itself to the client that made the original request to the ESP32.
We have to use handleCloudflareResponse()—the other method we needed to implement—to forward the AsyncUDPPacket packet we received from Cloudflare DNS:
1 | |
2 | |
3 | |
4 | |
5 | |
6 | |
7 | |
8 | |
9 | |
10 | |
11 | |
12 | |
13 | |
14 | |
Notice that we use the ID from the responseHeader to check if the request is still in our map: if this is the case, we go ahead and respond to the client with the response we received from Cloudflare DNS.
Believe it or not, that's all the code we have to write - we're finally done!
Bringing it all together
Phew, that was a lot, but if you made it till this point, I'm hoping you learned something new!
We're ready to test out the code! If you upload this program onto your ESP32 (and change your iPhone's DNS server appropriately), you should see something like this when you try to access Instagram:
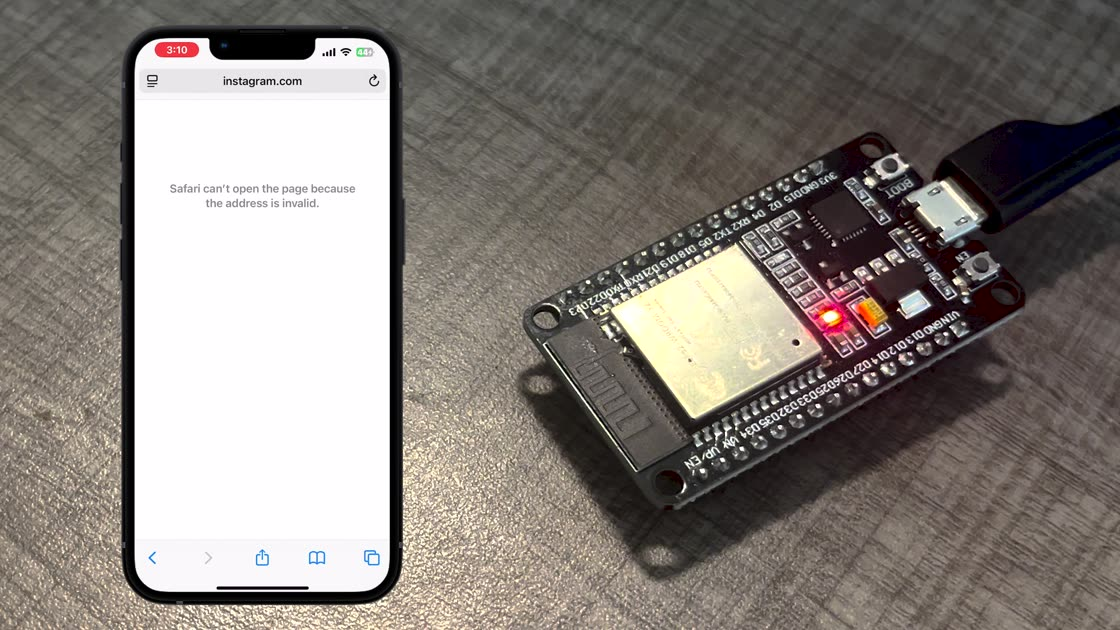
Hey, it works! 🙃
Signing off
I sincerely hope you've had as good of a time reading this article as I did writing it.
If you'd like to check out some of my other work, please go here. If you want to get in touch, you can (ironically enough) reach me on social media—Instagram, X/Twitter, Bluesky, LinkedIn—or through email: amanvir.com [at] gmail [dot] com.
Full code
For your reference, you can find the entirety of the code from the .ino file for this project below. Feel free to make your own blocklist.h for the sites you personally want to block!
1 | |
2 | |
3 | |
4 | |
5 | |
6 | |
7 | |
8 | |
9 | |
10 | |
11 | |
12 | |
13 | |
14 | |
15 | |
16 | |
17 | |
18 | |
19 | |
20 | |
21 | |
22 | |
23 | |
24 | |
25 | |
26 | |
27 | |
28 | |
29 | |
30 | |
31 | |
32 | |
33 | |
34 | |
35 | |
36 | |
37 | |
38 | |
39 | |
40 | |
41 | |
42 | |
43 | |
44 | |
45 | |
46 | |
47 | |
48 | |
49 | |
50 | |
51 | |
52 | |
53 | |
54 | |
55 | |
56 | |
57 | |
58 | |
59 | |
60 | |
61 | |
62 | |
63 | |
64 | |
65 | |
66 | |
67 | |
68 | |
69 | |
70 | |
71 | |
72 | |
73 | |
74 | |
75 | |
76 | |
77 | |
78 | |
79 | |
80 | |
81 | |
82 | |
83 | |
84 | |
85 | |
86 | |
87 | |
88 | |
89 | |
90 | |
91 | |
92 | |
93 | |
94 | |
95 | |
96 | |
97 | |
98 | |
99 | |
100 | |
101 | |
102 | |
103 | |
104 | |
105 | |
106 | |
107 | |
108 | |
109 | |
110 | |
111 | |
112 | |
113 | |
114 | |
115 | |
116 | |
117 | |
118 | |
119 | |
120 | |
121 | |
122 | |
123 | |
124 | |
125 | |
126 | |
127 | |
128 | |
129 | |
130 | |
131 | |
132 | |
133 | |
134 | |
135 | |
136 | |
137 | |
138 | |
139 | |
140 | |
141 | |
142 | |
143 | |
144 | |
145 | |
146 | |
147 | |
148 | |
149 | |
150 | |
151 | |
152 | |
153 | |
154 | |
155 | |
156 | |
157 | |
158 | |
159 | |
160 | |
161 | |
162 | |
163 | |
164 | |
165 | |
166 | |
167 | |
168 | |
169 | |
170 | |
171 | |
172 | |
173 | |
174 | |
175 | |
176 | |
177 | |
178 | |
179 | |
180 | |
181 | |
182 | |
183 | |
184 | |
185 | |
186 | |
187 | |
188 | |
189 | |
190 | |
191 | |
192 | |
193 | |
194 | |
195 | |